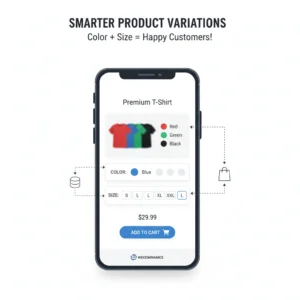
Have you ever browsed an online store for a t-shirt and been able to choose your size and color, all on the same product page? As a customer, it’s a seamless experience. But as a new WooCommerce store owner, you might wonder how to create these product options without listing each combination as a separate item.
The answer lies in one of WooCommerce’s most powerful features: Variable Products. This guide will demystify the process. By the end of this post, you’ll know exactly how to create a product with multiple options, like different sizes for a t-shirt, giving your customers the choice they want and boosting your store’s professionalism.
What Are Variable Products?
In simple terms, a Variable Product is a single product that contains variations of itself. Think of a single t-shirt product that comes in Small, Medium, and Large sizes. Instead of creating three separate product pages, you create one and define the “Size” as an attribute.
Each variation (Small, Medium, Large) can have its own unique details, like:
- Price
- Stock Level
- Image
- SKU
This keeps your store organized and provides a clean, intuitive shopping experience for your customers.
The Core Concept: Attributes and Variations
Before we dive into the steps, it’s crucial to understand two key terms:
- Attributes: These are the characteristics of your product. For a t-shirt, the attributes would be “Size” and “Color.” Attributes are the options you give to the customer.
- Variations: These are the specific combinations of those attributes. If you have sizes (S, M, L) and colors (Red, Blue), the variations would be “Small Red,” “Small Blue,” “Medium Red,” and so on. Variations are the specific products you are selling.
Think of it like this: Attributes are the question (“What size do you want?”), and Variations are the specific answers you have in stock (“A Small is available for $549”).
How to Create a Variable Product: A Step-by-Step Guide
Let’s walk through creating a t-shirt with different sizes, just like in the video example.
Step 1: Create a New Product and Add Basic Details
- Go to your WordPress admin panel and navigate to Products > Add New.
- Give your product a title (e.g., “Cool Graphic T-Shirt”).
- Add a detailed product description and a short description.
- Set your product gallery images.
[Screenshot placeholder: The standard WooCommerce product edit screen with title, description, and images filled in.]
Step 2: Creating Global Attributes
Before we can add options to our product, we need to define the attributes themselves. The best practice is to create Global Attributes, which can be re-used on other products.
- Go to Products > Attributes.
- You’ll see fields for “Name” and “Slug.” For the name, enter
Size. The slug will auto-generate. - Click Add attribute.
[Screenshot placeholder: The Attributes screen showing where to add the "Size" attribute.]
- Now, click Configure terms for your new “Size” attribute.
- Here, you’ll add the individual sizes. In the “Name” field, type
Smalland click Add new Size. Repeat this forMediumandLarge.
[Screenshot placeholder: The Configure terms screen showing the S, M, L terms for the Size attribute.]
You’ve now created a “Size” attribute that any product in your store can use!
Step 3: Configure the Product Data
This is where the magic happens.
- Back in your product edit screen, find the Product Data meta box. By default, it’s set to “Simple product.” Click the dropdown and change it to Variable product.
[Screenshot placeholder: The Product Data dropdown with "Variable product" selected.]
You’ll notice the tabs change. The “General” tab where you usually set the price disappears! This is normal. For variable products, the price is set at the variation level.
Step 4: Link the Attribute to Your Product
- Click on the Attributes tab.
- From the custom product attribute dropdown, select your pre-made “Size” attribute.
- Click Add.
- A new box will appear. Click Select all to choose all the sizes (Small, Medium, Large).
- Crucially, check the box that says Used for variations.
- Click Save attributes.
[Screenshot placeholder: The Attributes tab inside the product, showing the Size attribute with "Used for variations" checked.]
Step 5: Generate and Configure Variations
- Now, click on the Variations tab.
- A dropdown will appear. Select Create variations from all attributes and click Go. WooCommerce will automatically generate one variation for each size.
- You will now see a list of your variations (Small, Medium, Large). Initially, they will have a warning that they have no set price and won’t be visible.
- Click the small arrow to expand one of the variations (e.g., “Small”).
- Here, you can set details for this specific variation:
- Regular Price: Enter
549 - Sale Price: (Optional) You could enter a sale price here.
- Manage Stock? You can check this to set a specific stock quantity just for the Small size.
- Image: You can upload a specific image for this variation.
- Regular Price: Enter
- Repeat this process for “Medium” (setting the price to
649) and “Large” (setting the price to749). - Once all variations are configured, click Save Changes at the bottom of the Variations tab.
- Finally, Publish or Update your product.
[Screenshot placeholder: The expanded view of a single variation, showing the price and other fields being filled in.]
Congratulations! You Did It!
Now, when you visit your new product page, you should see a dropdown selector for “Size.” When a customer selects a size, the price will update automatically to reflect the price you set for that specific variation. You’ve just created a professional, functional variable product!
Want to Put This Lesson into Practice?
Reading about a setting is one thing, but the best way to learn WooCommerce is by doing. If you’re nervous about breaking your live store, or don’t have a safe place to experiment, a ‘sandbox’ is the perfect solution.
We offer a WooCommerce Practice Account that gives you a pre-built WooCommerce store to test, tweak, and practice on, completely risk-free.
[Link to your Practice Account Service Page]
Ready to Go from Practice to Pro?
Once you’re comfortable with the basics, you might wonder, “What’s next?” A practice account is great for testing, but a structured course gives you the complete roadmap from beginner to confident store owner.
Our comprehensive course guides you through every aspect of WooCommerce, from setup and product creation to advanced shipping, payments, and marketing, all with expert guidance.
If you’re serious about mastering WooCommerce, check out our WooCommerce 101 – Recorded Video Course.
Conclusion
Mastering variable products is a fundamental step in growing your WooCommerce store. It allows you to efficiently manage complex inventory and provide a superior customer experience. You’ve learned the key concepts of Attributes and Variations, and walked through the practical steps of creating a product with different sizes and prices. Remember, practice makes perfect, so don’t be afraid to experiment with these powerful tools to see what works best for your products.
Common Questions About Variable Products
Can I have more than one attribute, like both Size and Color?
Absolutely! You can create a “Color” attribute with terms like Red, Blue, and Green. When you add both the “Size” and “Color” attributes to a product and generate variations, WooCommerce will create a variation for every possible combination (e.g., Small Red, Small Blue, Medium Red, etc.).
Why is my variable product showing as “Out of Stock”?
This is a common beginner issue. When you switch a product from “Simple” to “Variable,” the general price and stock settings are removed. The stock and price must be defined at the individual variation level. If you don’t set a price for a variation, it will be considered “Out of Stock” and hidden from the store.
Can I set a different image for each variation?
Yes, you can! When you expand a variation in the Variations tab, there is an option to Upload an image. This is perfect for showing a t-shirt in different colors or a product from different angles.